The mead have just been standing in our living room and slowly clearing. I have tasted it quite a few times and the taste of oak is not really there anymore, so I decided to oak it again. But first I removed the precipitate from the bottom.
Now the only dis-advantage I have encountered with the fermenter is that you do not know the level of precipitate. So this time I collected the precipitate in a bottle to see how fast the liquid separates from the cell mass and what the ratio is between the two. I found that with a quick flush I collect a bit more than 1/4 of a liter, which I just poured into properly sized glass flask. I will leave the flask for tomorrow and then I will see what it looks like.
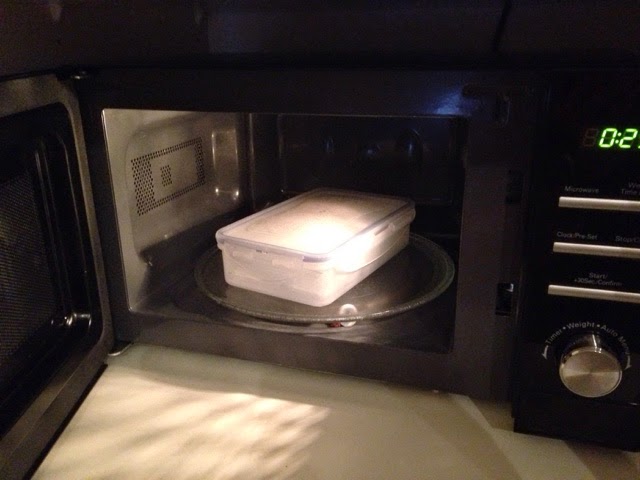
Now, time for oaking. I figured I would use about half of what I used before, as I just want a little bit more oak taste. So 20 g was weighed into a "hop-sock" and the sock with oak was wetted for a few minutes. Then the water was removed and the wet sock was put in the microwave for 1 min. The I just added the sock to the fermenter
Now it is just time to wait - again
This is a blog about the joy of brewing mead and acquiring the honey, fruits and spices that are used for each batch of mead. I'm a bee keeper in my spare time and the fruits/berries and spices are preferably from my own garden or gardens nearby.
Friday, 20 May 2016
Sunday, 7 February 2016
2015 batch 1: Cyser - Removing oak and back sweetening
It has now been almost 4 weeks since I added the oak to my mead, and after tasing it, I was very satisfied. The taste was actually so pleasent that I had to taste twice ..... :o)... but still the mead is quite dry. Then I measured the SG of the mead and it was now just 6 Oe - I earlier measured it to 8 Oe, so perhaps a slow fermentation or lots of precipitation has lowered the SG even more
Before disturbing the mead I also removed the sediment from the bottom. Again, a garbage bag over the outlet, and then I just let it run at full flow for less than a second. Emptying the garbage bag into a measuring beaker, I had removed about 0.5L (including spill.....)
Finally, it was time for back sweetening. I had saved a container with 1500 g honey for this purpose. I as it turned out this is pretty much exactly what I need, so I did not have to supply with extra.
First a little calculation. The volume of the mead is about 39L. So using the formula of HoneyOeshcle equations in knowledge tools of this blog (HERE) under addition of honey you get:
Oe(new) = (Oe(must) * V(must) + m(honey)/3) / (V(must) + m(honey)/density(honey)*1000)
So,
Oe(new) = [6 * 39L + 1500g/3] / [39L + 1500g/1400g/L] = 18.3
Just below 20 is OK with me since the mead I have made earlier do end up on the sweet side after some storage time
Honey is not easily stirred into solution at 22C so instead of just pouring it into the conical fermenter I just poured as much as I could into a 5L flask and filled it up to with mead after. I weighed the container before and after addition to get the best measure of how much honey I added: 1647g-137g = 1510g honey added. The flask was than shaken and rolled for quite a while and finally left overnight on the kitchen table.
The follwing day the honey was dissolved and there was no sticky "strings" on the in-side of the glass flask. So the flask was then emptied into the fermenter and the entire mead was stirred well, Then the lid was put back on. After half an hour I took the lid off again and measured SG. I measured about 18 Oeshcle so it matched very well my calculations.
Since I had added a well shaken portion of mead, I wanted to remove as much of the oxygen as possible. So I used my CO2 generator to just add a layer of CO2 over the mead to ensure that it will be saturated with CO2. I did not lock the lid during the addition of CO2, so that any over pressure would be equalized.
Then I sealed up the fermenter and now it is just time to wait. Wait to see if the fermention restarts, and wait to see if cloudyness of the honey cleares up by precipitation. Otherwise I am ready with Kieselsol and Chitosan - and a filtration if neccessary :o)
Before disturbing the mead I also removed the sediment from the bottom. Again, a garbage bag over the outlet, and then I just let it run at full flow for less than a second. Emptying the garbage bag into a measuring beaker, I had removed about 0.5L (including spill.....)
Then it was time to remove the "hop bag" with oak. This was quite easy to do because of the string I had attached to the bag. Now I could just pull it out instead of digging after it with a brewing spoon.
Finally, it was time for back sweetening. I had saved a container with 1500 g honey for this purpose. I as it turned out this is pretty much exactly what I need, so I did not have to supply with extra.
First a little calculation. The volume of the mead is about 39L. So using the formula of HoneyOeshcle equations in knowledge tools of this blog (HERE) under addition of honey you get:
Oe(new) = (Oe(must) * V(must) + m(honey)/3) / (V(must) + m(honey)/density(honey)*1000)
So,
Oe(new) = [6 * 39L + 1500g/3] / [39L + 1500g/1400g/L] = 18.3
Just below 20 is OK with me since the mead I have made earlier do end up on the sweet side after some storage time
Honey is not easily stirred into solution at 22C so instead of just pouring it into the conical fermenter I just poured as much as I could into a 5L flask and filled it up to with mead after. I weighed the container before and after addition to get the best measure of how much honey I added: 1647g-137g = 1510g honey added. The flask was than shaken and rolled for quite a while and finally left overnight on the kitchen table.
The follwing day the honey was dissolved and there was no sticky "strings" on the in-side of the glass flask. So the flask was then emptied into the fermenter and the entire mead was stirred well, Then the lid was put back on. After half an hour I took the lid off again and measured SG. I measured about 18 Oeshcle so it matched very well my calculations.
Since I had added a well shaken portion of mead, I wanted to remove as much of the oxygen as possible. So I used my CO2 generator to just add a layer of CO2 over the mead to ensure that it will be saturated with CO2. I did not lock the lid during the addition of CO2, so that any over pressure would be equalized.
Then I sealed up the fermenter and now it is just time to wait. Wait to see if the fermention restarts, and wait to see if cloudyness of the honey cleares up by precipitation. Otherwise I am ready with Kieselsol and Chitosan - and a filtration if neccessary :o)
Saturday, 30 January 2016
Shopping for a scale
I have an old laboratory scale which has a range of 0-600g with 2 decimals precision. Unfortunately it is 6% off, so all results have to be corrected. I cannot calibrate it either without some special equipment that I of cause do not have. So I have been looking for a 2 decimal scale for a while, but they are just really really expensive.
Going out for dinner with my wife in the city (without kids) we just happened to pass one of these stores selling all kinds of pipes for various illegal substances - and there it was - in the window - a small 0-100 g scale with 2 decimals precision for 300 Kr/about 43USD/38Euro. Compared to the prices I have been looking at, this is dirt cheap.
I bought one and took it home for testing. I have several discarded reference weights from work, which are discarded every 5 years since it is cheaper to by new weights rather than recalibrating the old ones (!?!). For my purpose they will do till the day I die :o)
My 10 g reference weight measured 10.02g which I find surprisingly accurate for the price of the scale. And then it is small and can easily be put away in a drawer. I can highly recommend this type of scales.
And the dinner? It was great. We went to a restaurant called Cofoco and had a wine menu for 5 terrific dishes, but that is a different story...........
Going out for dinner with my wife in the city (without kids) we just happened to pass one of these stores selling all kinds of pipes for various illegal substances - and there it was - in the window - a small 0-100 g scale with 2 decimals precision for 300 Kr/about 43USD/38Euro. Compared to the prices I have been looking at, this is dirt cheap.
I bought one and took it home for testing. I have several discarded reference weights from work, which are discarded every 5 years since it is cheaper to by new weights rather than recalibrating the old ones (!?!). For my purpose they will do till the day I die :o)
My 10 g reference weight measured 10.02g which I find surprisingly accurate for the price of the scale. And then it is small and can easily be put away in a drawer. I can highly recommend this type of scales.
And the dinner? It was great. We went to a restaurant called Cofoco and had a wine menu for 5 terrific dishes, but that is a different story...........
Friday, 29 January 2016
2015 batch 1: Cyser - Tasting
Just a short up-date. It has now been almost 3 weeks since I added the oak. I tasted it after one week and already the taste was quite different from the sample I took before oaking.
Now after the 3 weeks the taste of oak is not that different but the mead has been much more rounded and the bitterness significantly reduced compared to the reference sample. The smell has also improved dramatically - actually so much that it is now quite pleasant.
OAK IS A DIVINE INGREDIENT :o)
Furthermore I did a check on the pH just to verify that it had not changed due to the oaking. pH of the mead was measured to 3.97 and the reference sample before oaking to exactly the same value. Great!
Pic: The mead to the left and the reference sample to the right. Calibration solution above. Note that the mead is a but more cloudy than the reference sample. Glas with demineralized water is used for rinsing the electrode of the pH meter.
The appearance of the mead is just a bit cloudy and I will leave it to precipitate for one more week before removing the sediment - then it be time for back-sweetening.
Now after the 3 weeks the taste of oak is not that different but the mead has been much more rounded and the bitterness significantly reduced compared to the reference sample. The smell has also improved dramatically - actually so much that it is now quite pleasant.
OAK IS A DIVINE INGREDIENT :o)
Furthermore I did a check on the pH just to verify that it had not changed due to the oaking. pH of the mead was measured to 3.97 and the reference sample before oaking to exactly the same value. Great!
Pic: The mead to the left and the reference sample to the right. Calibration solution above. Note that the mead is a but more cloudy than the reference sample. Glas with demineralized water is used for rinsing the electrode of the pH meter.
The appearance of the mead is just a bit cloudy and I will leave it to precipitate for one more week before removing the sediment - then it be time for back-sweetening.
Monday, 11 January 2016
2015 batch 1: Cyser - Oaking
Today I added toasted oak to the mead. From last year (see HERE) I have the American oak, medium toast, which I will use again.
I opened the fermenter to check the volume - just below 40 L. So last year I used 25 g for about 20 L, so 50 grams were weighed out in a "hop sock"
The sock was then closed with a knot. I tied about 50cm of sewing string to the sock, which I will attach outside of the fermenter. Initially the sock will float but sink once the wood gets saturated with mead.
To sterilize, I let the oak and sock soak for a few minutes in COLD water, lifted the sock and let it drip before I put it in a microwave container. Heating for 1 min at full power was enough for the steam to develop.
Then I just carried the bag to the fermenter and dropped it in. The strings was attaced to the handle on the outside. It is so thin that it should not leave marks in the silicone seal in the lid.
As last time to took a sample of the mead prior to adding the oak just to have a taste reference of the mead before oaking. That just makes it easier to evaluate the effect.
Now it is just time for waiting and tasting till I think it is OK. I assume 2-3 weeks will do it, but I will rather stop a bit prematurely and eventually add more oak than get to the point where I realize that too much oak has been added - better safe than sorry...
I opened the fermenter to check the volume - just below 40 L. So last year I used 25 g for about 20 L, so 50 grams were weighed out in a "hop sock"
The sock was then closed with a knot. I tied about 50cm of sewing string to the sock, which I will attach outside of the fermenter. Initially the sock will float but sink once the wood gets saturated with mead.
To sterilize, I let the oak and sock soak for a few minutes in COLD water, lifted the sock and let it drip before I put it in a microwave container. Heating for 1 min at full power was enough for the steam to develop.
Then I just carried the bag to the fermenter and dropped it in. The strings was attaced to the handle on the outside. It is so thin that it should not leave marks in the silicone seal in the lid.
As last time to took a sample of the mead prior to adding the oak just to have a taste reference of the mead before oaking. That just makes it easier to evaluate the effect.
Now it is just time for waiting and tasting till I think it is OK. I assume 2-3 weeks will do it, but I will rather stop a bit prematurely and eventually add more oak than get to the point where I realize that too much oak has been added - better safe than sorry...
Friday, 8 January 2016
2015 batch 1: Cyser - Improved racking procedure
Just got a GoPro Hero 4 Silver camera, so this is my first movie clip :o) It took forever to put together but I just have to get familiar with the software. Bare with me - it is not a "Tarantino like" stroke of genius.
Well, I found a way to remove the sediment without splashing all over the kitchen, and this clip shows how it was done (if it works...).
Comments to the clip: 1) When sampling the mead I discard the first tap since this is the stale part in the tube inside. The second tapping should be representative of the batch. Keep in min that as the particulates settles, the mead will be much clearer at the surface 2) The used Star San HB was diluted 2 ml to 1L of deminiralized water. This leaves a clear solution. If I use tap water, the high level of calsium carbonate will react with something in the Star San solution which then becomes opaque.
And of cause the test sample was also used for tasting :o)
Well, I found a way to remove the sediment without splashing all over the kitchen, and this clip shows how it was done (if it works...).
Comments to the clip: 1) When sampling the mead I discard the first tap since this is the stale part in the tube inside. The second tapping should be representative of the batch. Keep in min that as the particulates settles, the mead will be much clearer at the surface 2) The used Star San HB was diluted 2 ml to 1L of deminiralized water. This leaves a clear solution. If I use tap water, the high level of calsium carbonate will react with something in the Star San solution which then becomes opaque.
And of cause the test sample was also used for tasting :o)
Wednesday, 6 January 2016
2015 batch 1: Cyser - Precipitation of yeast and racking
The following weeks I just waited for the yeast to settle. Then it was time to enjoy the pleasure of my new fermenter. Take of the airlock, open the bottom valve fully for a short time, close again, and the mead has now been "racked" without being disturbed.
Well, there is always something one forget to consider. The water level in the fermenter is 65-70cm, and the pressure at the bottom valve is quite high. So when the valve is opened fully it was kind of naive to expect the I could catch it in a bowl. Instead it sprayed out, hit the side of the bowl and splashed in all directions. If you look close at the first pic you can see the splashes all over the legs of the fermenter and the refrigerator next to it......and by the way, the precipitated yeast does not smell nice.
All in all I tapped about 1 L. First a plug of yeast came out followed by a quick splash, so I guess this compares well to racking a large plastic fermenter, but loosing a smaller volume of mead.
Time to clean the kitchen....
Well, there is always something one forget to consider. The water level in the fermenter is 65-70cm, and the pressure at the bottom valve is quite high. So when the valve is opened fully it was kind of naive to expect the I could catch it in a bowl. Instead it sprayed out, hit the side of the bowl and splashed in all directions. If you look close at the first pic you can see the splashes all over the legs of the fermenter and the refrigerator next to it......and by the way, the precipitated yeast does not smell nice.
All in all I tapped about 1 L. First a plug of yeast came out followed by a quick splash, so I guess this compares well to racking a large plastic fermenter, but loosing a smaller volume of mead.
Time to clean the kitchen....
2015 batch 1: Cyser - Fermentation progress
The following days i monitored the fermentation progress by measuring SG, pH and temperature.
Whenever the temperature increased to just above 24.0C I added ice-cubes to a cooler and let the cooling system of the fermenter bring the temperature down - usually to around 18C within half an hour. The ice was then melted and I just stopped the flow.
pH was measured to ensure that it would drop due to the generation of CO2 by the yeast, and that pH would not drop so low that the yeast was knocked out. When the fermentation was over pH was measured and I will than later have to adjust pH to just below 4 to stabilize the mead.
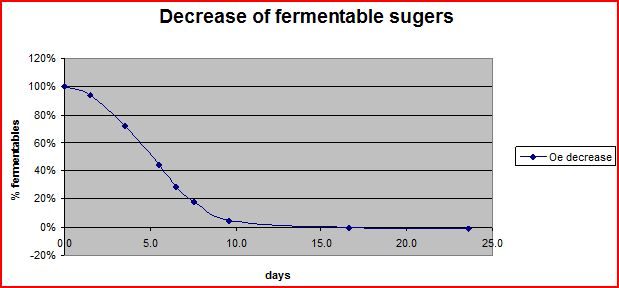
SG was measured to follow the conversion of sugars and this time I used staggered nutrition addition SNA to ensure that the yeast had the best conditions untill the alcohol limit of the yeast had been reached. The initial gravity, OG, was 1.116. The yeast can tolerate 15% so from experience, I should get about 14% alcohol for a drop in gravity of 0.100 or 100 Oe, so 15% would be about 107 Oe. So for a 100% conversion my gravity should drop from 1.116 (100%) to 1.009 (0%). The results are plotted below.
As can be seen from the graph I have full conversion - actually a bit more - and the fermentation is almost complete after 10 days. There are also no sudden premature change of fermentation rate which is typically due the lack of nutrients. All in all an almost perfect fermentation :o)
Details from the log are found below
Wednesday 14th of October
Temperature
23.9C - OK
OG 1.116
Starter
added in the morning at 8
Happy
bubbling in the evening
Thursday 15th of October
Evening
SG 1.110
Temperature
23.1C
1st nutrition addition
5g of
Fermaid K
16g of
Ammonium Carbonate (Hjortetaksalt)
4 g of
Potassium Carbonate (Pot Ash)
Make slurry
of all powder with 100 ml of water.
Add slowly
while stirring. Stir well when all is added and bubbling settles.
pH after
addition: 3.58 – OK
Taste nice,
smell a bit off
Saturday the 17th of October
Evening
SG 1.086
Temperature
23.1C
pH 3.52
before addition
2nd
nutrition addition
3g Fermaid
K
9g Ammonium
hydrogen carbonate (Hjortetaksalt)
4g
Potassium hydrogen carbonate (Pot Ash)
pH after
addition 3.64
Monday the 19th of October
Evening
SG 1.056
Temperature
23.4C
pH – not
measured before addition
3rd
nutrition addition
3g Fermaid
K
6g Ammonium
hydrogen carbonate (Hjortetaksalt)
4g
Potassium hydrogen carbonate (Pot Ash)
pH 3.86
after addition.
Tuesday the 20th of October
Evening
SG 1.040
Temperature
24.2C
pH 3.79
Cooled with
1 aliquot of ice
Wednesday 21st of October
Evening
SG 1.028
Temperature
22.5C
pH –
Friday 23rd of October¨
Evening
SG 1.014
Temperature
22.8C
pH –
Friday the
6th of November
SG = FG
=0.008
Remove
bottom yeast – waste 1 L
Temperature:
21.5C
pH: 4.01
2015 batch 1: Cyser - Brewing day
Monday the 12th of October 2015
Day of brewing
12.5 kg summer honey
25L of apple juice - about 22L from Ingrid Marie apples and 3 L from Pigion apples and a few "Ananas" apples.
2 tubes of Sweet Mead Wine Yeast from White Labs (WLP 720) liquid yeast.
Fermaid K
Pot Ash (Potassium Carbonate, K2CO3) - a baking ingredient
Salt of Hartshorn substitute (Ammonium Bicarbonate, NH4HCO3) - a baking ingredient
In the afternoon the liquid yeast was taken out of the refrigerator and left on the kitchen table to warm up to room temperature. This will "wake up" and prepare the yeast for the starter. According to White Labs the yeast should be ready in 3-6 hours.
In the evening it was time to prepare the must. Since I only have a 16L pot I had to split the apple juice in 3 portions. First 10L of apple juice was heated to 70C and was then taken off the heat. This should knock out microorganism growing in the apple juice. After about 10 min a bit more than half of the honey - approximately 7kg - was poured into the pot and stirred well to to dissolve the honey. The entire volume was then poured into the fermenter. I also checked the density of the apple juice before heating it up. It was about 48 Oechsle.
As the starter will be prepared from this first aliquot I need to do a few calculations. The final volume of the aliquot was about 10L+7kg / 1.4kg/L = 15L. So from the honey Oechsle equation I get an Oechsle value of m/(3*V) = 7000g/(3*15) = 156 Oe due to the honey and from the apple juice I get 48 Oe * 10L / 15 L = 32 Oe so in total about 188 Oe.
For the starter 400 ml was poured into a 2000 ml Erlenmeyer flask and diluted to 1600 ml. Oe of the starter should then be about 188 Oe / 1600ml * 400ml = 47 or somewhere in the range 45-50 which is just perfect. Unfortunately I forgot to measure this but I trust the estimate :o) After the dilution the temperature was almost just right: 28C, so the starter was covered with a paper towel and set to cool a bit more.
A second aliquot of 10 L apple juice was then poured into the pot, heated to 70C and left for 10 min. The rest of the honey was poured into the pot and the must was stirred well before being added to the fermenter
The third and final aliquot of 5 L apple juice was poured into the pot and heated to 70C and left for 10 min. then the apple juice was used to rinse the honey container several times to ensure that all the honey had been dissolved. This was then also added to the fermenter.
Fresh water was then added to 45L. As 25L of apple juice had an Oechsle value of about 48 and diluted to 45L that would contribute to about 48Oe*25L/45L]=26.7 Oechsle. From the honey-Oechsle equation the honey contributes with about Oe = m/(3*V) = 12500/(3*45) = 92,6 Oechsle. i.e. in total ~119 Oechsle. This will be checked when the must has cooled down.
About 6 hours after the yeast was removed from the refrigerator, it was time to add it to the starter. The temperature was 24C and both cylinders were added.
Now I will wait 2 days before the starter is added to the must and at this time the must should be at room temp.
Day of brewing
12.5 kg summer honey
25L of apple juice - about 22L from Ingrid Marie apples and 3 L from Pigion apples and a few "Ananas" apples.
2 tubes of Sweet Mead Wine Yeast from White Labs (WLP 720) liquid yeast.
Fermaid K
Pot Ash (Potassium Carbonate, K2CO3) - a baking ingredient
Salt of Hartshorn substitute (Ammonium Bicarbonate, NH4HCO3) - a baking ingredient
In the afternoon the liquid yeast was taken out of the refrigerator and left on the kitchen table to warm up to room temperature. This will "wake up" and prepare the yeast for the starter. According to White Labs the yeast should be ready in 3-6 hours.
In the evening it was time to prepare the must. Since I only have a 16L pot I had to split the apple juice in 3 portions. First 10L of apple juice was heated to 70C and was then taken off the heat. This should knock out microorganism growing in the apple juice. After about 10 min a bit more than half of the honey - approximately 7kg - was poured into the pot and stirred well to to dissolve the honey. The entire volume was then poured into the fermenter. I also checked the density of the apple juice before heating it up. It was about 48 Oechsle.
As the starter will be prepared from this first aliquot I need to do a few calculations. The final volume of the aliquot was about 10L+7kg / 1.4kg/L = 15L. So from the honey Oechsle equation I get an Oechsle value of m/(3*V) = 7000g/(3*15) = 156 Oe due to the honey and from the apple juice I get 48 Oe * 10L / 15 L = 32 Oe so in total about 188 Oe.
For the starter 400 ml was poured into a 2000 ml Erlenmeyer flask and diluted to 1600 ml. Oe of the starter should then be about 188 Oe / 1600ml * 400ml = 47 or somewhere in the range 45-50 which is just perfect. Unfortunately I forgot to measure this but I trust the estimate :o) After the dilution the temperature was almost just right: 28C, so the starter was covered with a paper towel and set to cool a bit more.
A second aliquot of 10 L apple juice was then poured into the pot, heated to 70C and left for 10 min. The rest of the honey was poured into the pot and the must was stirred well before being added to the fermenter
The third and final aliquot of 5 L apple juice was poured into the pot and heated to 70C and left for 10 min. then the apple juice was used to rinse the honey container several times to ensure that all the honey had been dissolved. This was then also added to the fermenter.
Fresh water was then added to 45L. As 25L of apple juice had an Oechsle value of about 48 and diluted to 45L that would contribute to about 48Oe*25L/45L]=26.7 Oechsle. From the honey-Oechsle equation the honey contributes with about Oe = m/(3*V) = 12500/(3*45) = 92,6 Oechsle. i.e. in total ~119 Oechsle. This will be checked when the must has cooled down.
About 6 hours after the yeast was removed from the refrigerator, it was time to add it to the starter. The temperature was 24C and both cylinders were added.
Now I will wait 2 days before the starter is added to the must and at this time the must should be at room temp.
Tuesday, 3 November 2015
2015 batch 1: Cyser - Juicing apples
This year i will again make a cyser. I will only make one batch of mead but this time I will scale up by a factor of about 2
As this has been a terrible year with really poor weather. I have only harvested 23 kg of honey from my one hive, which is about half of what I harvested last year. I had planned for at pure honey mead, but I also want some honey for my self and some to sell (this is what pays for the bees). So I have only been able to put about 15 kg aside - not enough for a 50 L batch
So cyser it is :o). Fortunately it has been a great apple year and my apple trees have been full. Especially my "Ingrid Marie" tree. So I figured I wanted to try to make and Ingrid Marie mead. The great thing about this apple is, that it is quite low on acid, so malolactic fermentation should not be necessary at all.
Last year I pressed the apple myself, but I found that a local apple plantation offered to press apples for free, so I figured I would wait for this even though it was in October which is a bit late for these apples. But again the poor weather was a great help, since the apples matured 2-3 week later than usual and most of the apples were just perfect when the day arrived.
Most of the apples are Ingrid Marie apples - only the third box from the top contains Pigeon apples and a bit of "Red Ananas" apples - (sounds silly if translated to English...and I do not know if the sort have a proper English name?)
As this has been a terrible year with really poor weather. I have only harvested 23 kg of honey from my one hive, which is about half of what I harvested last year. I had planned for at pure honey mead, but I also want some honey for my self and some to sell (this is what pays for the bees). So I have only been able to put about 15 kg aside - not enough for a 50 L batch
So cyser it is :o). Fortunately it has been a great apple year and my apple trees have been full. Especially my "Ingrid Marie" tree. So I figured I wanted to try to make and Ingrid Marie mead. The great thing about this apple is, that it is quite low on acid, so malolactic fermentation should not be necessary at all.
Last year I pressed the apple myself, but I found that a local apple plantation offered to press apples for free, so I figured I would wait for this even though it was in October which is a bit late for these apples. But again the poor weather was a great help, since the apples matured 2-3 week later than usual and most of the apples were just perfect when the day arrived.
Most of the apples are Ingrid Marie apples - only the third box from the top contains Pigeon apples and a bit of "Red Ananas" apples - (sounds silly if translated to English...and I do not know if the sort have a proper English name?)
The automated shredder and press are so much faster than when I did it manually - and the yield significantly higher. I ended up with a bit more than 25 L out of about 35-40 kg of apples. So far so good
Monday, 2 November 2015
Setting up the Chronical fermenter
First the fermenter had to be cleaned with a TSP solution. TSP is quite cheap, so I had no problem making a 10L solution in a mixing ratio according to the producer. All valves, seals and tri-clamps was dipped in the solution and scrubbed with a bottle brush. Then these were rinsed in water. The inside of the fermenter was scrubbed with the TSP solution using a soft sponge and rinsed with water.
Jacket to isolate the fermenter. I associate the smell of neoprene with great times as scuba diver, so I felt strange being so happy while dressing up a fermenter.
A solution of StarSan was prepared by mixing 2 ml StarSan in 1L of demineralized water. This solution is used for passivation of the steel. The solution was added to a sprayer and sprayed onto all surfaces of the fermenter and valves. The StarSan makes a nice foam that covers the surfaces quite well. The surfaces was sprayed a couple of times over half an hour and the entire fermenter and valve was rinsed with water before being set aside for drying.
The next day the fermenter was collected
Jacket to isolate the fermenter. I associate the smell of neoprene with great times as scuba diver, so I felt strange being so happy while dressing up a fermenter.
The fermenter was no ready for use, with thermometer in the center. It looks fantastic :o). The small cooler is for ice water to be used as cooling source - hope it is large enough. I also purchased a somewhat larger airlock due the larger volume and hence the increased amount of CO2 produced during the fermentation.
One thing though. The pump for FTSS temperature control is connected to the wall with a US plug. If you buy this fermenter get an adapter for European power outlets.
Shopping for a conical fermenter
I have for a long time been looking at a conical fermentor as this would be an alternative to racking the mead again and again. I have been looking at several brands. Basically, I do not trust that the Chinese fermenters are food grade stainless steel, even though they are specified as such, so these was fairly fast out of the equation.
I was also looking at Blichmann's but these are really expensive. They might be great but right now I am not sure if this is the way to go for me.
Over the last year I fell head over heals for the fermentor from Ss Brewtech, but these were not sold outside the US.
As time went by I found that a new home brewing shop opened very close to were I live named Humlecentralen (HERE) - and what do you know - he sold equipment from Ss Brewtech. I was thrilled.
So now I have the Chronical half barrel fermentor equipped with FTSS temperature control - and it is just so sexy..... :). Even Alexander think it is a great toy
I also purchased the leg extensions which I can only highly recommend, because the bottom valve is really positioned low so unless you open directly to a drain you cannot get a tray underneath it unless the fermenter is lifted.
Now that a stainless steel fermenter has entered the scene I also got chemicals for cleaning (TSP) and passivation (StarSan), as recommended by Ss Brewtech.
TSP (tri-sodium-phosphate) is a relatively strong base that is used for cleaning the fermenter. This is done by scrubbing the surfaces with a soft sponge wetted in a TSP solution.
After the cleaning the fermenter is passivated with StarSan which is a solution of phosphoric acid (~50%) which passivates, dodecyl-benzene-sulphonic acid which is a foaming agent (5-15%) and some antibacterial component(s) which is hush hush (proprietary according to the MSDS)
This is the mild version of the passivation process I know from work which is sodium hydroxide wash followed by a nitric acid passivation bath..... Not really a process you want to fiddle with at home in your kitchen
Looking so much forward to try it out
I was also looking at Blichmann's but these are really expensive. They might be great but right now I am not sure if this is the way to go for me.
Over the last year I fell head over heals for the fermentor from Ss Brewtech, but these were not sold outside the US.
As time went by I found that a new home brewing shop opened very close to were I live named Humlecentralen (HERE) - and what do you know - he sold equipment from Ss Brewtech. I was thrilled.
So now I have the Chronical half barrel fermentor equipped with FTSS temperature control - and it is just so sexy..... :). Even Alexander think it is a great toy
I also purchased the leg extensions which I can only highly recommend, because the bottom valve is really positioned low so unless you open directly to a drain you cannot get a tray underneath it unless the fermenter is lifted.
Now that a stainless steel fermenter has entered the scene I also got chemicals for cleaning (TSP) and passivation (StarSan), as recommended by Ss Brewtech.
TSP (tri-sodium-phosphate) is a relatively strong base that is used for cleaning the fermenter. This is done by scrubbing the surfaces with a soft sponge wetted in a TSP solution.
After the cleaning the fermenter is passivated with StarSan which is a solution of phosphoric acid (~50%) which passivates, dodecyl-benzene-sulphonic acid which is a foaming agent (5-15%) and some antibacterial component(s) which is hush hush (proprietary according to the MSDS)
This is the mild version of the passivation process I know from work which is sodium hydroxide wash followed by a nitric acid passivation bath..... Not really a process you want to fiddle with at home in your kitchen
Looking so much forward to try it out
Death in the family
It has been a while since my last post. My mother was very sick during the spring with pancreas cancer. It is a horrible type of cancer and there is almost nothing you can do to stop or slow it down, and she passed away this June.
With funeral, clearing and selling the house and ending all ongoing arrangements in her life and just dealing with the loss, I have not been doing much about brewing of mead, and of cause not posted anything on this blog.
Now that some time has passed, and most of all the things I had to deal with have been finalized, things are getting back to what can reasonably be called normal.
May she rest in peace!
Pic is from December 2014 when my mother and I when to a fish spa for some mother and son quality time. She died 6 month later
All I can say is that whenever you have an opportunity to give money for cancer research, do not hesitate to donate.
With funeral, clearing and selling the house and ending all ongoing arrangements in her life and just dealing with the loss, I have not been doing much about brewing of mead, and of cause not posted anything on this blog.
Now that some time has passed, and most of all the things I had to deal with have been finalized, things are getting back to what can reasonably be called normal.
May she rest in peace!
All I can say is that whenever you have an opportunity to give money for cancer research, do not hesitate to donate.
Monday, 11 May 2015
2014 batch 3: Bochet (9) - Bottling the Blackberry Bochet
So, when I cannot bottle my currant mead, I will just start bottle the Blackberry Bochet instead.
Same procedure. Washing bottles.
This "Double Blast" bottle cleaner is worth its weight in gold. Also the "Fast Rack" frame in the back fits perfectly for my choice of bottles. The bottles were also sprayed with Star San and then rinsed again.
Alle the gear was lined up
All clean and ready
The bottles were filled with my trusted siphon. Unfortunately I did not get a picture.
Placing the black heat shrink capsules on top of each 0.5L bottle. This is also a presentable way of hiding the silver colored screw cap :o)
Shrink the capsules in slow boiling water. A quick dip in the water is enough to get the tight seal. Just remember to use a glove to protect the hand, and a tool to hold the capsule in place. I am very fond of my bent knife - works very well.
The bottles were cleaned to get rid of spots and finger prints. Then the bottles were labeled. Using my primitive set-up to put the label in the same position, just adds a more appealing look to the bottle.
and voila!
Same procedure. Washing bottles.
This "Double Blast" bottle cleaner is worth its weight in gold. Also the "Fast Rack" frame in the back fits perfectly for my choice of bottles. The bottles were also sprayed with Star San and then rinsed again.
Alle the gear was lined up
All clean and ready
The bottles were filled with my trusted siphon. Unfortunately I did not get a picture.
Placing the black heat shrink capsules on top of each 0.5L bottle. This is also a presentable way of hiding the silver colored screw cap :o)
Shrink the capsules in slow boiling water. A quick dip in the water is enough to get the tight seal. Just remember to use a glove to protect the hand, and a tool to hold the capsule in place. I am very fond of my bent knife - works very well.
The bottles were cleaned to get rid of spots and finger prints. Then the bottles were labeled. Using my primitive set-up to put the label in the same position, just adds a more appealing look to the bottle.
and voila!
2014 batch 2: Currant mead (14) - Still does not clear up
I was actually planning on bottling my currant mead but it does not clear up. So I started shopping for equipment to try filtering the mead
I will try to push the mead over the filter using vacuum on the collector side rather than pressurizing the mead. to push it through the filter. The idea is that it would be less risky to remove air/CO2 from the mead by vacuum rather than increasing the amount of air (+ air pollutants) by pressuring the mead
The inspiration I got from YouTube. Here is part 1:
I like the concept of filtrating the mead rather than using clearing agents. For removing particulate matter you can use 5µm or 3µm filter. Using 1 or 2 µm filters will remove yeast cells. Finaly, for sterilization you can use a 0.45 or 0.22µm filter will also remove bacteria cells too.
What you use will depend on what you wish to remove, and how much material you expect to remove, and how will you want to remove it. Smaller pore sizes will result in higher back pressure, and as the material is trapped in the filter the pressure/vaccum needed to move the mead through the filter must be increased.
I have no issues with un-wanted organism, so I will go for just removing particulate matter, and/or yeast cells - but it depends on which filters I can get my hands on. :o)
I have started shopping for the process. It is quite amazing what you can get on ebay and aliexpress from China for hardly any money when it comes to electronics and wires etc. :o)
I will try to push the mead over the filter using vacuum on the collector side rather than pressurizing the mead. to push it through the filter. The idea is that it would be less risky to remove air/CO2 from the mead by vacuum rather than increasing the amount of air (+ air pollutants) by pressuring the mead
The inspiration I got from YouTube. Here is part 1:
And here is part 2:
I like the concept of filtrating the mead rather than using clearing agents. For removing particulate matter you can use 5µm or 3µm filter. Using 1 or 2 µm filters will remove yeast cells. Finaly, for sterilization you can use a 0.45 or 0.22µm filter will also remove bacteria cells too.
What you use will depend on what you wish to remove, and how much material you expect to remove, and how will you want to remove it. Smaller pore sizes will result in higher back pressure, and as the material is trapped in the filter the pressure/vaccum needed to move the mead through the filter must be increased.
I have no issues with un-wanted organism, so I will go for just removing particulate matter, and/or yeast cells - but it depends on which filters I can get my hands on. :o)
I have started shopping for the process. It is quite amazing what you can get on ebay and aliexpress from China for hardly any money when it comes to electronics and wires etc. :o)
Tuesday, 21 April 2015
First major check on the hive
Sunday the 17th of April was a great day with plenty of sun and only a little wind. I can really feel the summer coming. So today will be the first major check on the hive.
But first things first. I did not get a chance to disinfect my equipment during the fall last year so this had to be done first.
All boxes was scraped to get as much propolis off and then it was all sprayed with Virkon S which do its work and then decompose afterwards. So all I had to do was spray and leave to dry.
All minor equipment was soaked in household ethanol for several hours and the leftover propolis can then be scraped off easily - this was a tip from another beekeeper that I read in a magazine and it works beautifully :o) It is very effective, and the equipment can just be left to dry in the kitchen sink and then is look as good as new.
Then it was time to go through the hive. First I weighed the hive and it had gained weight for the first time - so the honey collection has started.
The slope on the curve 0.044 kg or 44g corresponds to the average daily loss in mass during the winter. This is almost the same as last year where the daily loss was about 40g
The family is now very big and more than half of the 10 plates in the winter box contained sealed breeding cells. Also pollon was present and almost a full plate with recently harvested honey - the honey cells are a bit darker than the cell from the winter feeding.
Furthermore the edges of some of the breeding plates contained cells for drones. These cells are a bit bigger than the cells for the normal working bees. This means that it is definitely time to insert the drone plate - a plate were the bee can built freely which they will dedicate for drones.
So I removed the plate furthest away from the entrance which was the only one containing winter feeding and it was still almost full and weighing about 2 kg. Then moved two plates containing fresh honey back and inserted the drone plate. Hereafter the 6 plates with the breeding cells were found and finally the plate with pollen by the entrance. This was almost exactly how the hive developed last year
Since the bees already started to collect honey I decided to add a second box today too. I was a bit surprised that the bees were already investigating it less than a hour after I assembled the hive - guess the bees were more than ready for the expansion of their hive.
I all looks great. Unfortunately I did not find the queen, but judging from the size of the hive, she must be doing fine.
But first things first. I did not get a chance to disinfect my equipment during the fall last year so this had to be done first.
All boxes was scraped to get as much propolis off and then it was all sprayed with Virkon S which do its work and then decompose afterwards. So all I had to do was spray and leave to dry.
All minor equipment was soaked in household ethanol for several hours and the leftover propolis can then be scraped off easily - this was a tip from another beekeeper that I read in a magazine and it works beautifully :o) It is very effective, and the equipment can just be left to dry in the kitchen sink and then is look as good as new.
Then it was time to go through the hive. First I weighed the hive and it had gained weight for the first time - so the honey collection has started.
The slope on the curve 0.044 kg or 44g corresponds to the average daily loss in mass during the winter. This is almost the same as last year where the daily loss was about 40g
The family is now very big and more than half of the 10 plates in the winter box contained sealed breeding cells. Also pollon was present and almost a full plate with recently harvested honey - the honey cells are a bit darker than the cell from the winter feeding.
Furthermore the edges of some of the breeding plates contained cells for drones. These cells are a bit bigger than the cells for the normal working bees. This means that it is definitely time to insert the drone plate - a plate were the bee can built freely which they will dedicate for drones.
So I removed the plate furthest away from the entrance which was the only one containing winter feeding and it was still almost full and weighing about 2 kg. Then moved two plates containing fresh honey back and inserted the drone plate. Hereafter the 6 plates with the breeding cells were found and finally the plate with pollen by the entrance. This was almost exactly how the hive developed last year
Since the bees already started to collect honey I decided to add a second box today too. I was a bit surprised that the bees were already investigating it less than a hour after I assembled the hive - guess the bees were more than ready for the expansion of their hive.
I all looks great. Unfortunately I did not find the queen, but judging from the size of the hive, she must be doing fine.
Thursday, 2 April 2015
2014 batch 2: Currant mead (13) - Not quite ready for bottling yet
The currant mead has now been standing for quite a while, and from several samples it looks clear. I decided to transfer it to a final glass fermenter from which I will bottle the mead.
I used my electric pump for the transferring which went well, but I was surprised to see how dark it actually is. I was expecting it to be more like a brownish rosé wine, but instead it was almost pitch black
After the transferring was completed, I added 5 L CO2 with my CO2 generator, to be to minimize the risk of oxidation now that the mead has been stirred up.
Interestingly the mead take up some CO2 which can be seen on the airlock which shows a slight vacuum.
Now, it the mead ready for bottling? I am not sure. I tried to shine a LED flash light through it to get an impression of the clarity, and it still does not look ready.
I will check up on the mead periodically to see if the clarity changes.
Tuesday, 31 March 2015
2014 batch 1: Cyser (10) - Bottling of the Capsi-Cyser
It has been a while since I have been writing, and in the mean time my mead has been standing in the corner of the kitchen maturing. After tasting the Cyser and evaluating the clarity visually I was certain that it was time to bottle the mead.
Monday I lifted the fermenter up on the kitchen table and tilted it a bit. I added 5L of CO2 to ensure that the mead was saturated. Then I let it rest until the next day. Later Monday, I sterilized all the bottles I needed for the racking plus a bit extra just in case any of the bottles were damaged.
Today it was time. Gathering all needed equipment on the table and I was ready to go. The mead looks so tempting with a slightly dark yellow color. All bottles were filled next to my reference bottle containing exactly 500 g of water, i.e. 0.50L. You see it to the right in the picture.
Filling the bottles took some time but it is so rewarding to se the final product take shape. When the pleasant smell of apple hit the room I felt sure that this is going to be a great mead.
Then it was time to add the chilies. I have not been able to get my hand on more Birds Eye chili, but instead I found "Red chili" from the same region. According to the sales person they were a bit less strong but with more taste. My own tongue could not pick up the difference, so I added the same amount of chili as I would with the Birds Eye - ½ chili without seeds to 0.5L
Bad experiences has taught me to use plastic gloves when handling more than just one chili :o), but I could still feel the tingling of the chili in the nose. Finally ½ a chili was added and the screw cap tightened.
Now it was time to make the bottles look good. I bought black bottle crimp tops to "hide" the silver screw cap. I was very surprised to learn how easy they are to put on:
First you need a tool to hold the crimp top in place. No proper tools were available, so I bent a knife for the purpose (ssshhh don't tell the wife...). Then a glove to protect the hand.
The process is quite easy. Just keep a pot of water boiling lightly. Hold the crimp top in place with the knife and just dip the top of the bottle shortly in the water (1 sec) - and voila - you are done.
Then the bottles were cleaned and finally the label was added. This is a home printed label but next year I will be ready with some more pro-looking labels. Never the less, I like the rough look to the bottle with the chili swimming around - it is very presentable.
Can't wait till my next bottling :o)
Monday I lifted the fermenter up on the kitchen table and tilted it a bit. I added 5L of CO2 to ensure that the mead was saturated. Then I let it rest until the next day. Later Monday, I sterilized all the bottles I needed for the racking plus a bit extra just in case any of the bottles were damaged.
Today it was time. Gathering all needed equipment on the table and I was ready to go. The mead looks so tempting with a slightly dark yellow color. All bottles were filled next to my reference bottle containing exactly 500 g of water, i.e. 0.50L. You see it to the right in the picture.
Filling the bottles took some time but it is so rewarding to se the final product take shape. When the pleasant smell of apple hit the room I felt sure that this is going to be a great mead.
Then it was time to add the chilies. I have not been able to get my hand on more Birds Eye chili, but instead I found "Red chili" from the same region. According to the sales person they were a bit less strong but with more taste. My own tongue could not pick up the difference, so I added the same amount of chili as I would with the Birds Eye - ½ chili without seeds to 0.5L
Bad experiences has taught me to use plastic gloves when handling more than just one chili :o), but I could still feel the tingling of the chili in the nose. Finally ½ a chili was added and the screw cap tightened.
Now it was time to make the bottles look good. I bought black bottle crimp tops to "hide" the silver screw cap. I was very surprised to learn how easy they are to put on:
First you need a tool to hold the crimp top in place. No proper tools were available, so I bent a knife for the purpose (ssshhh don't tell the wife...). Then a glove to protect the hand.
The process is quite easy. Just keep a pot of water boiling lightly. Hold the crimp top in place with the knife and just dip the top of the bottle shortly in the water (1 sec) - and voila - you are done.
Then the bottles were cleaned and finally the label was added. This is a home printed label but next year I will be ready with some more pro-looking labels. Never the less, I like the rough look to the bottle with the chili swimming around - it is very presentable.
Can't wait till my next bottling :o)
Sunday, 25 January 2015
2014 batch 2: Currant mead (12) - More oak....
Tasting my currant mead against the sample I took before I added oak first time, I found that the difference between the two was evening out with just a bit of aging, so I decided to give my mead one more shot of oak. Same oak as before: American oak chips - medium toast.
I added 25 g again, but this time I did not boil the oak. Instead I just rinsed the chips and hop bag in cold tap water and put the bag in the microwave for 60s at full power.
The smell of the wood was quite intense, and it must have been all that great stuff I boiled off last time. Then I took a small sample of the mead for reference before I finally I dropped the bag into the mead and sealed the fermentor.
Today, after 1½ week, I did a tasting and compared with the sample I took before the second oak addition. The fruitiness was still present but now the oak was quite significant but not overpowering the mead. So I decided to remove the oak again. Also, the mead feels sweeter with the oak, and the fruit acids had been mellowed out quite a bit. I get the feeling that when using oak I should probably not have sweetened the mead to 25 oechsle but rather stopped at 20.
I added 25 g again, but this time I did not boil the oak. Instead I just rinsed the chips and hop bag in cold tap water and put the bag in the microwave for 60s at full power.
The smell of the wood was quite intense, and it must have been all that great stuff I boiled off last time. Then I took a small sample of the mead for reference before I finally I dropped the bag into the mead and sealed the fermentor.
Today, after 1½ week, I did a tasting and compared with the sample I took before the second oak addition. The fruitiness was still present but now the oak was quite significant but not overpowering the mead. So I decided to remove the oak again. Also, the mead feels sweeter with the oak, and the fruit acids had been mellowed out quite a bit. I get the feeling that when using oak I should probably not have sweetened the mead to 25 oechsle but rather stopped at 20.
Subscribe to:
Posts (Atom)